 The Spinner Rig has accounted for thousands and thousands of monster carp since its popularity sky rocketed a few years ago. We have had a number of people ask for a blog post on how to tie the Ronnie Rig and we have asked our resident angling expert Wayne Box to show you how he does it..... I tend to use the Spinner Rig one of two ways, either with a very stiff boom that I crimp to the hook section or with a more flexible boom section such as a coated braid that I tie using conventional knots. Both have their place but if there is any debris on the bottom then I will always go for the more flexible hooklink material to avoid the rig lifting up off the bottom. Constructing the Spinner Rig is fairly straightforward but first of all let's take a look at the components we need:
MATERIALS NEEDED FOR SPINNER RIG
- Hooks
- Spinner swivels
- Kickers
- Hook ring swivels
- Hook beads
- Hooklink material
- Crimps and crimping tool if using the Boom material.
- Hooklink sleeve
- Bait floss
- Baiting needle
- Hair stop
- Scissors

The items you see here are the exact items I use for my rigs but have a play around and see what components work for you.
STEP 1 - ATTACH A SPINNER SWIVEL TO THE EYE OF THE HOOK

STEP 2 - SLIDE ON THE KICKER
Cut down a medium kicker sleeve by about 5mm and slide over the eye of the hook wide end first (the thinner end should be closer to the hook point)
STEP 3 - COVER THE HOOK & SWIVEL
slide the kicker sleeve round the hook until it covers the swivel like in the photo
STEP 4 - APPLY THE HOOK RING SWIVEL
Slide a hook ring swivel over the point of the hook followed by a hook bead (I like mine positioned opposite the barb of the hook)
STEP 5 - CUT & ATTACH BRAID
If using a coated braid for a semi stiff boom, cut off 12 inches of coated braid and thread it through the eye of the swivel that is attached to the hook.
STEP 6 - TIE ON THE SWIVEL
Tie the swivel onto the coated braid using an overhand knot, make sure the loop of the knot is between 1 and 2 cm in size. Moisten down the knot and trim the tag ends nice and tight. Many people say that you have to use a figure of eight knot here and that's fine but I have tested this way and never had a knot give way or slip.
STEP 7 - THREAD A HOOK LINK SLEEVE ON
Thread a hooklink sleeve onto the other end of the coated braid and tie another figure overhand knot in that end, making sure you set the length of the rig. Moisten down and trim the tag end.
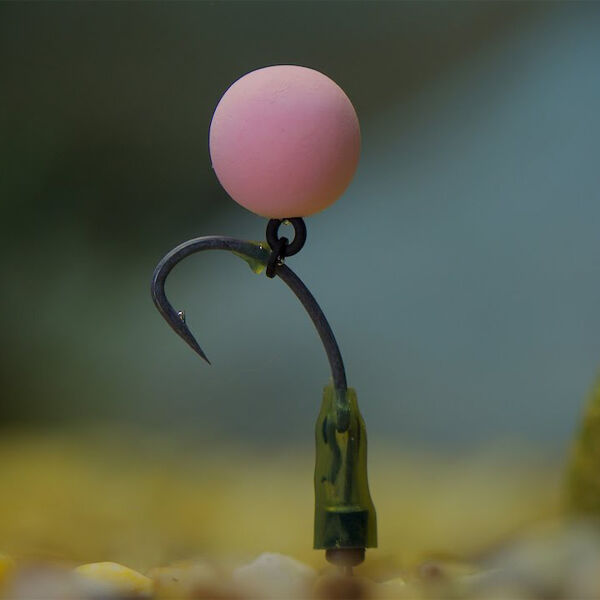
STEP 8 - APPLY HOOK BAIT WITH BAIT FLOSS
Take a length of bait floss and tie on your chosen pop up, I like to thread the bait onto the hair and secure with a hair stop, tie off with a couple of granny knots and blob with a lighter.
STEP 9 - ENSURE BAIT IS BALANCED
Ensure the bait is balanced by adding putty to the knot on the coated braid closest to the hook, you want the pop up to flutter down and be just held on the botto